Supplies:
(1) Roll Clear Contact Paper
or
(1) Roll of Packing Tape
(Depending on the size of your stickers)
A Razor Knife (X-Acto® Knife, For Example)
A Cutting Surface
A Ruler Or Other Straight Edge
A Word Processor
or
PowerPoint-like Program
(I used OpenOffice.org Draw for my stickers.
Also, be sure to view a great tutorial
on OpenOffice.org here.)
Laser Printer
or
InkJet Printer
(A laser printer is recommended for wet climates)
Something To Put Your Stickers On
These instructions will be based on PowerPoint since most people use Mircosoft Products.
Step 1
Start by opening PowerPoint.Select a Blank Presentation
Select a Blank Slide
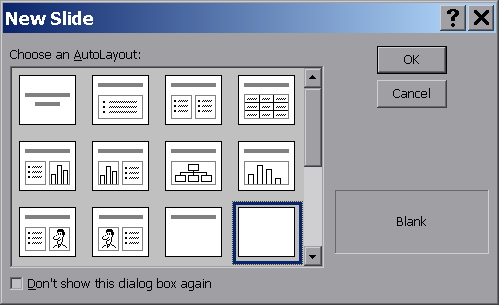
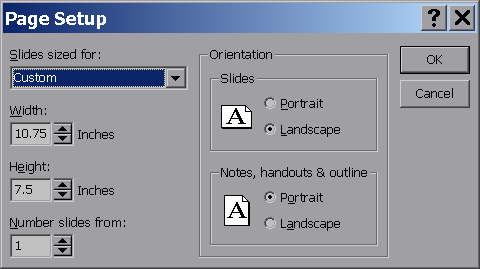
From the menu bar click File - Page Setup
Set the page to landscape. Increase Page width to 10.75 inches
Step 2
We are now ready to create our sticker. On the menu bar click Insert - Text Box.
Click and drag from left to right with your mouse to create a text box the width
of your slide. The box will automatically adjust down far enough for your text to fit.
How big the box will be will depend on the font size you want to use, of course.
Start typing your message. You can download my example by right-clicking here
and choosing Save Target... Once you are happy, play with your font size until you have
things just the way you want it. Also, change the font to one of your liking. I recommend
Arial Narrow for general legibility. I seem to fit about three phrases per page.
I also add a rule line between each phrase to help trim them down straight,
even though I use a ruler to help me cut. To do this, look for the Drawing toolbar
on your screen. It looks like this:

If you don't see this toolbar click on View - Toolbars - Drawing. It should now be
visible somewhere on your screen. Now that you've got the Drawing toolbar up,
click on the line drawing icon:

Now press a [Shift] key (this keeps the line straight or at 45 degree angles),
and starting at the left edge of the page, just below the text drag the cursor
to the right side of the screen. This is your trimming guide. If you're happy,
send your work to the printer.
Step 3
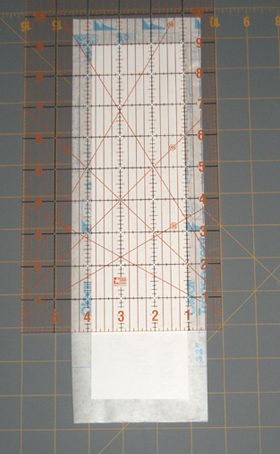
Take out the roll of contact paper and unroll enough to cut off a piece
that will allow you to create about a 1/2-inch border around your first
phrase. You can see how this is going to work by now:
Next peel back enough of the backing to start sticking the contact paper to your paper. Like this:
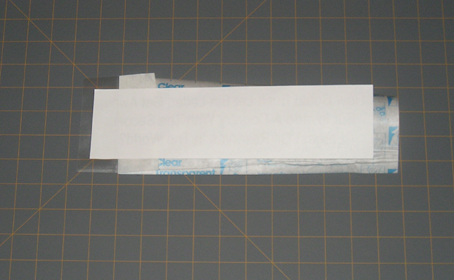
This isn't rocket science, of course, but starting like this helps maintain your border widths.
Once you have a little bit started go ahead and peel away the rest of the backing.
Don't throw the backing away as you can reuse it to cover the back of your sticker
until it's ready to mount, give away, or put anywhere people can see it.
That's it! Now go have fun you kids!